Short answer
Does Shopify have a shop-by-brand page?
No, and that is the first surprise for anyone who sells fifty labels. Shopify stores the brand on every product in the vendor field, reports sales by vendor in analytics, and generates a listing URL for each one at /collections/vendors?q=Brand%20Name. The page that lists all of those brands together is the piece it never builds. If you want the short version of what a shop-by-brand page even is, that is a two-minute read on its own.
That built-in vendor URL is worth understanding before you build anything, because it already works and it costs nothing.
What is the vendor page Shopify already makes for you?
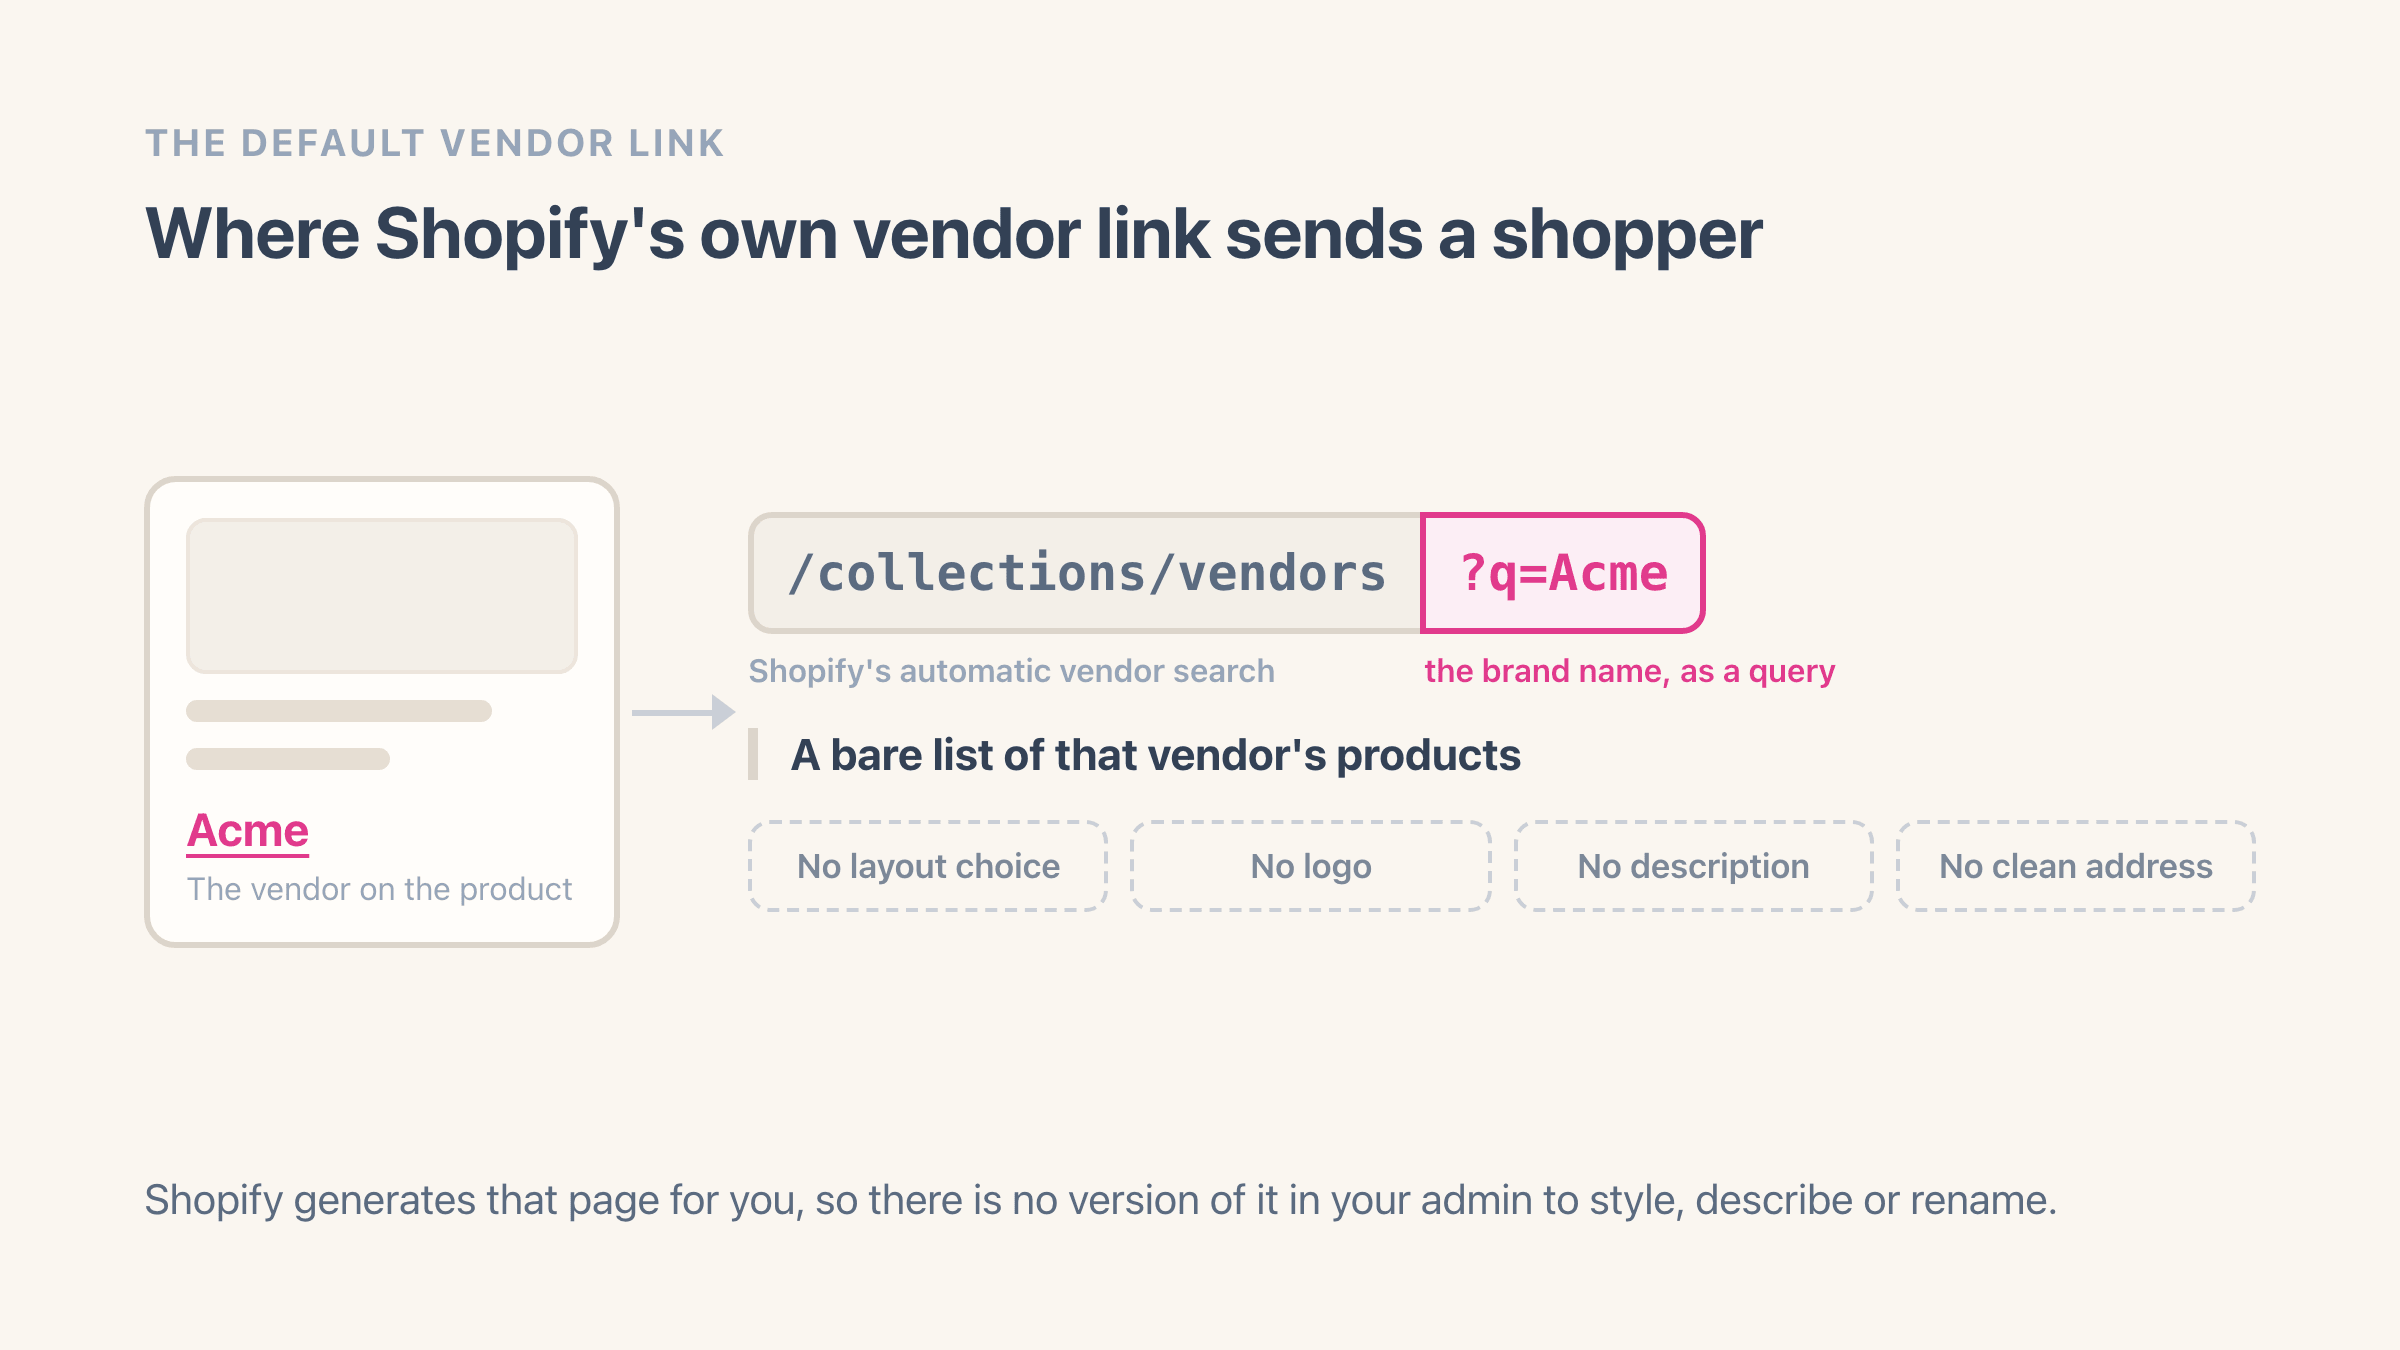
Every brand you stock already has a page, and nobody built it. Add a brand name to the end of your store address - yourstore.com/collections/vendors?q=Acme - and Shopify returns that brand's products. It is put together from the vendor value on your products at the moment somebody asks for it, which is why there is no trace of it anywhere in your admin.
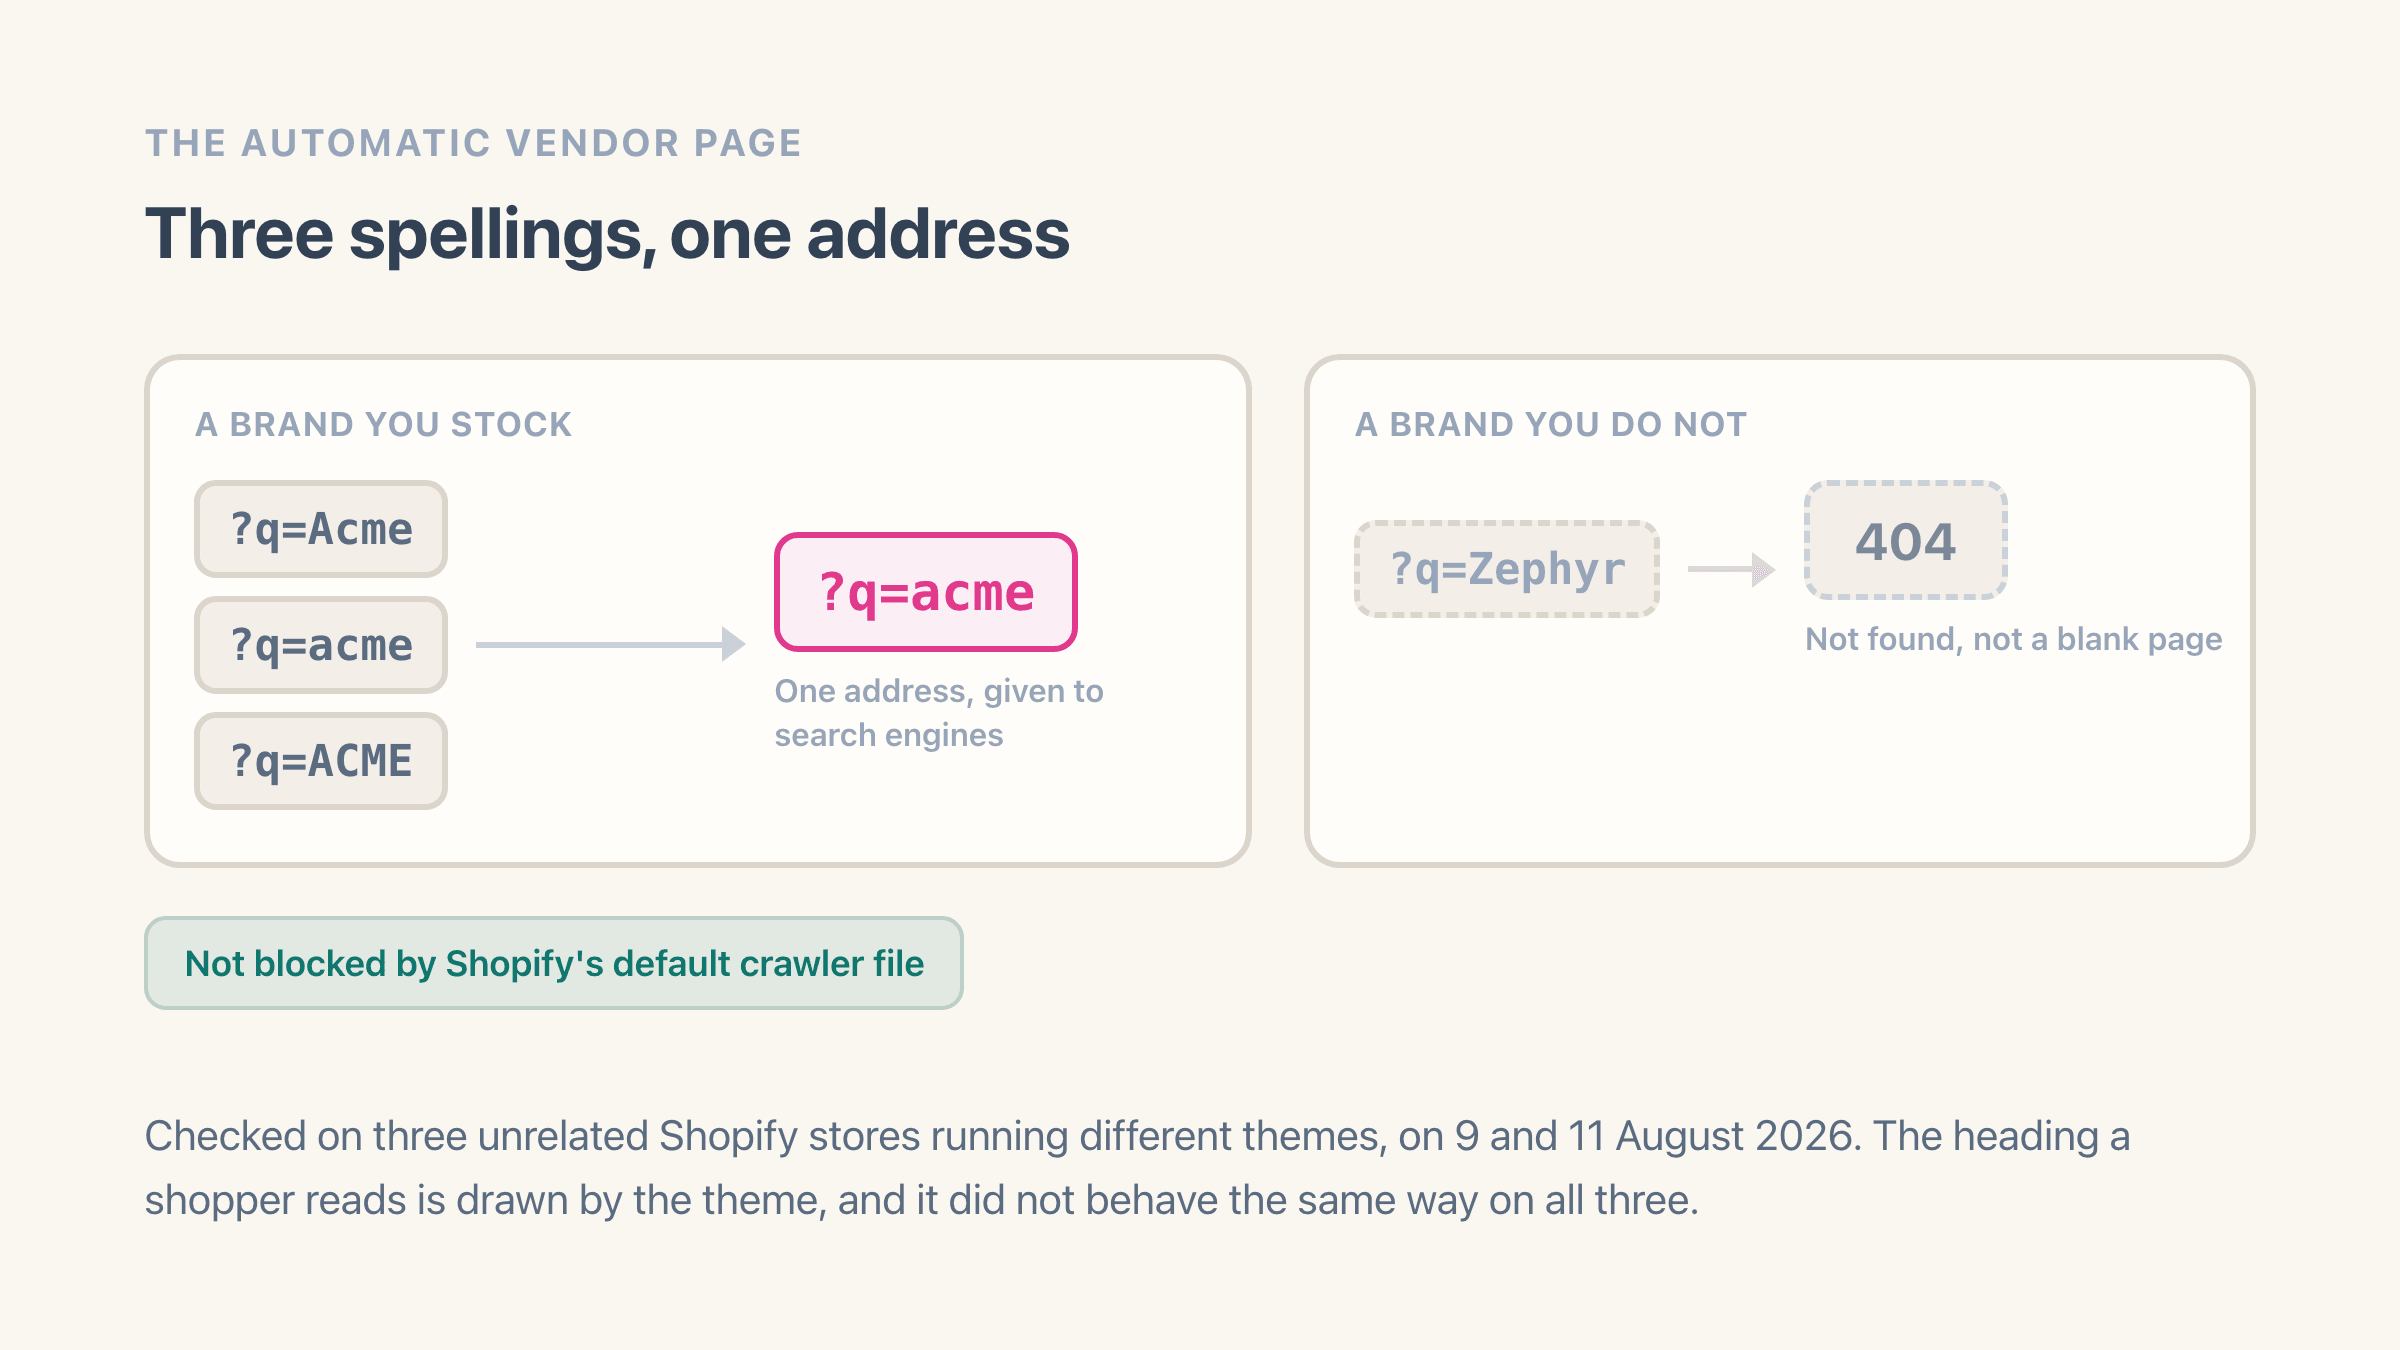
Your theme draws it with the same layout it uses for a collection, and it knows which brand it is showing, so the heading names the brand rather than reading something generic. Capital letters make no difference to which products come back. Shopify treats acme, Acme and ACME as the same request.
Ask for a brand you have never stocked and you get your store's not-found page rather than an empty list. I checked that on two live Shopify stores, on 9 and 11 August 2026, and both behaved the same way: a vendor with products behind it loaded normally, and a brand the shop has never carried came back as a 404. So this is not Shopify quietly making a page out of every word a shopper can type.
What you cannot do is change any of it.
- Nothing to open in Products > Collections, so no title, description or image of your own.
- No search-engine title or description either. Those are fields on a real collection, and this is not one.
- No address of your own. The vendor-query shape is fixed, so a brand cannot live at
yourstore.com/acme. - It exists whether you link to it or not, for as long as one product still carries that brand name.
Do those vendor pages turn up in Google?
They can, and most merchants have never looked. The instructions Shopify writes for crawlers by default block the sorted and filtered versions of your collection addresses and your own site search, and say nothing at all about vendor listings. I read that file on three unrelated Shopify stores, two on 9 August 2026 and a third on 11 August, and not one of them carried a line about vendors.
One thing works in your favour. Ask any of those stores for the same brand with different capital letters and each reported the same lower-case address to search engines, so Acme, acme and ACME collapse into one entry rather than three. That part is Shopify's own doing rather than a theme's, which is why it held on every store.
The heading is the part you cannot set, and it is the part that varies. Your theme prints it from the brand name in the link, and there is no title field anywhere to correct it.
On two of those stores it echoed the capitals somebody had typed, so the same products sat under Acme by one route in and ACME by another. On the third it came back in lower case however it was asked for, spelled differently from the brand written on the products themselves. That is the plain reason this page makes a poor place for a stranger from Google to land.
Why does your store link to these pages at all?
It is also how a fair number of merchants meet the page at all. One went to the Shopify Community back in 2022 having found a stack of these addresses in a crawl of their own store, indexable, with nothing on the site obviously linking to them.
The answer, when it eventually landed, was that a theme showing the vendor on the product block links to the brand's collection when its handle matches the vendor name, and falls back to this address when it does not. Make the handle match and shoppers go to the collection instead.
No app can restyle Shopify's vendor listing, ours included, because it is made on request and there is nothing behind it to edit. What an app can do is stop sending people there. Easy Brand Page points each brand card at a real collection or at the brand's own website, and drops back to the vendor listing only when a brand has neither, so no card lands on nothing. Free for 30 brands, and it never edits the vendor on your products.
How to build a shop-by-brand page by hand
None of this is hard. It is a few passes over your catalogue, and for a store carrying a dozen brands it is an afternoon.
Start by getting the brand list, because there is no vendor list page in the Shopify admin. Export your products to CSV and pull the unique values out of the Vendor column. That is exact, it takes a minute, and it also shows you the near-duplicate spellings you have been quietly accumulating.
Then, once per brand:
- Create an automated collection with the condition Product vendor is equal to the brand name. Shopify also offers contains, starts with and ends with on that condition, which is how you sweep two spellings into one collection.
- Set the handle so the URL reads
/collections/acme, then publish the collection to your Online Store sales channel. - Add a collection image, description and SEO title, because this is the page shoppers and Google actually land on.
- Link it from a new page under Online Store > Pages, with the brand names in alphabetical order.
- Put that page in your main menu or footer so shoppers can reach it without a search.
What happens when a brand comes or goes?
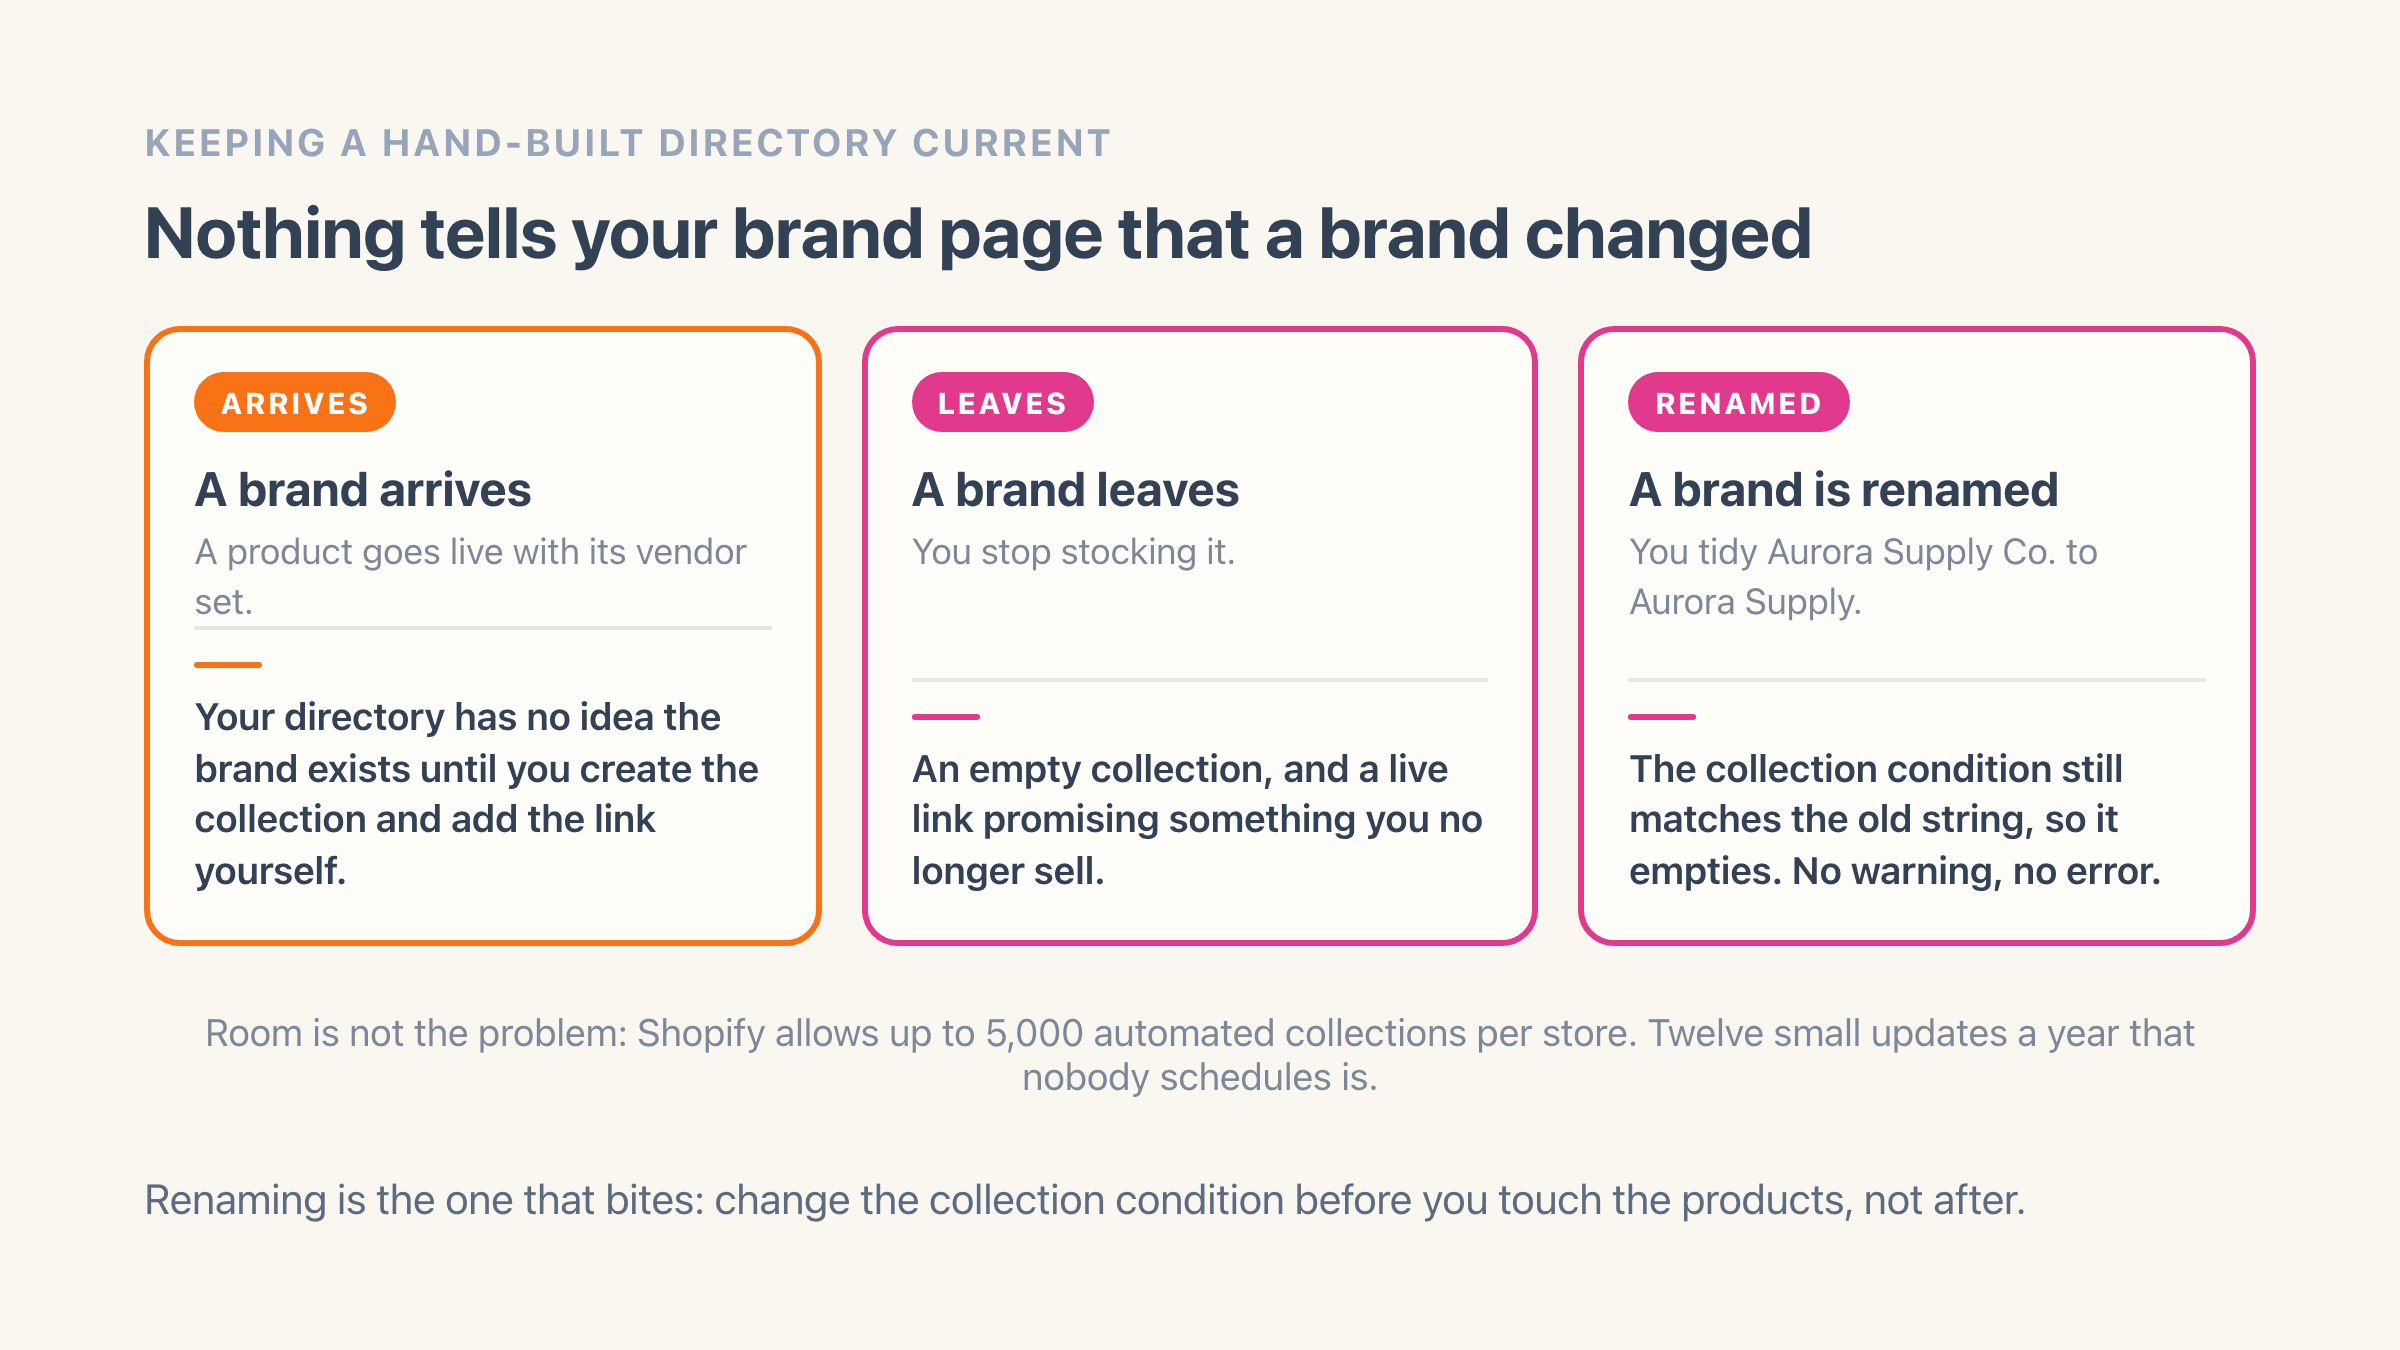
Nothing tells you. That is the whole problem in three words. A new product goes live with its vendor set and your directory has no idea the brand exists until you create the collection and add the link yourself. Drop a brand and it runs the other way: an empty collection and a live link promising something you no longer sell.
Renaming is the one that actually bites. An automated collection matching Product vendor is equal to "Acme Inc" goes on matching that exact spelling, so the moment you tidy 40 products to "Acme", the collection empties. No warning, no error, just a brand page with nothing on it. Change the collection condition before you touch the products, and check whatever links to the old vendor URL while you are in there.
Spelling drifts on its own too. "Acme", "acme" and "Acme " with a trailing space are three separate values to everything that reads the field, so they come back as three rows in your brand list. On a catalogue that has been running a couple of years, expect a handful of these.
Shopify allows up to 5,000 automated collections per store by default, so a big catalogue will not run out of room. Twelve small updates a year that nobody schedules is the real cost.
Can you list every vendor in Liquid instead?
You can, and under 50 brands it is genuinely the least work of any route here.
Your theme can ask Shopify for the vendor on every product in the store and print a link for each one, pointed at that brand's built-in listing page. It is about a dozen lines added to a theme file. If nobody at your end touches theme files, skip this route, because there is no setting in the admin that produces the same thing.
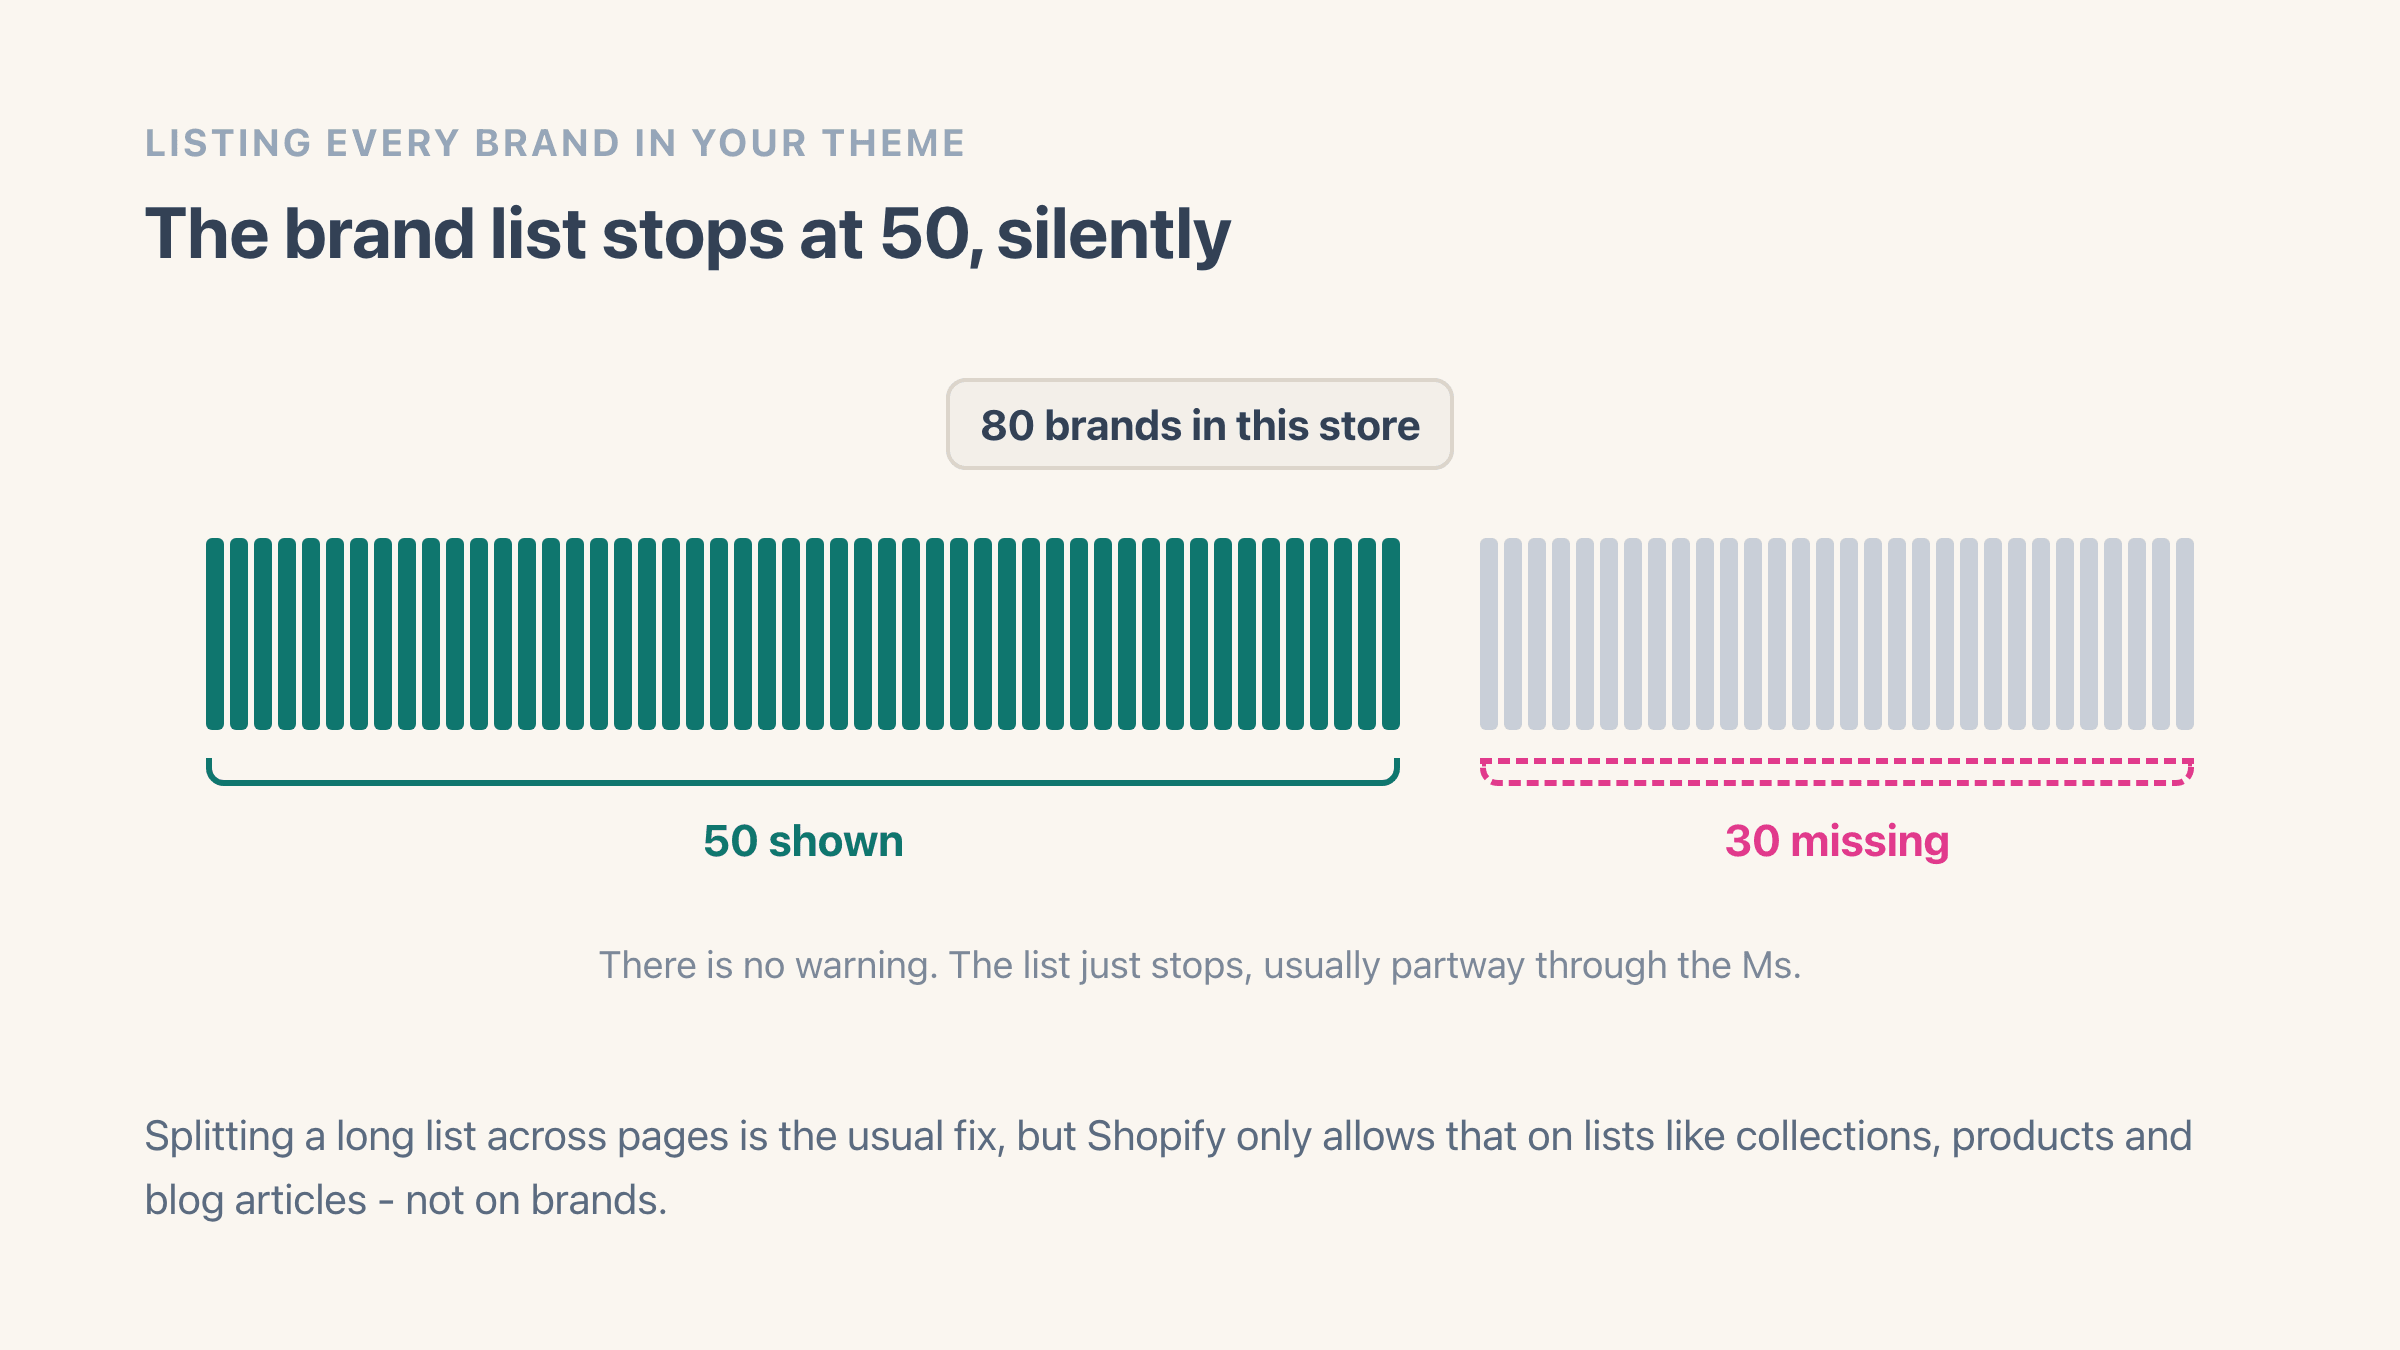
Then it stops at 50. Shopify's theme language works through a list like that 50 times at most. The usual way around a long list - splitting it across pages - only works on the lists Shopify allows it on. Collections, products, blog articles and search results are on that list. Your brand list is not.
A store with 80 brands shows 50 of them in silence, with no error to chase. If your brand list stops partway through the Ms, that is why.
You give up a fair amount besides. No search box, no A-Z jump, no logos, no product counts, no way to hide a brand you have stopped stocking, and no say in where each entry links. Every brand points at the built-in vendor URL whether that suits you or not.
How to add the brand page with an app instead
Install Easy Brand Page and it reads the vendor on every product and builds the brand list itself. You add the Brand page block in the theme editor and that is the setup finished. Nothing to prepare in a spreadsheet, no theme code to write.
The free plan is the whole directory for up to 30 brands: search, the A-Z filter, a featured-brands row, brand logos in a grid, all eight layout presets, the colour and spacing controls, vendor-to-collection mapping and the automatic syncing below. Above 30 brands you need the Plus plan, and the cap works by hiding rather than blocking - your oldest 30 brands stay on the storefront and the rest drop out of the directory until you upgrade.
Each brand links to its mapped collection if you have set one, to an external brand site if you enter a URL, and otherwise to the native /collections/vendors?q= page. So the directory is useful on day one even if you have never built a single brand collection.
Spelling variants get grouped for display: "Acme", "acme" and "Acme " show up as one brand, and your products are left exactly as they are, because the app never writes to the vendor field. Grouping only covers case, accents and surrounding spaces, so "Coca-Cola" and "Coca Cola" stay two separate brands. A hyphen is a real difference, and guessing there would merge brands that genuinely are not the same. Merging vendor spellings has the detail.
Where the brand block can go in your theme
Anywhere your theme takes an app block. Open the page you want it on in the theme editor, click Add section (or Add block if you are already inside a section), and pick Brand page from the Apps group. Shopify either drops the block into the section you chose or wraps it in an Apps section of its own. Most stores put it on a dedicated /pages/brands page and link that from the main menu.
Check your theme first. App blocks only work on an Online Store 2.0 theme, and the section you drop one into has to be built to accept them. An older vintage theme cannot take them at all. If you are running a theme from before 2021 that has never been updated, that is the thing to fix before you install anything, brand page or otherwise.
Four more blocks ship alongside it and belong in different places: Brand slider for a scrolling row of logos on the homepage, Brand link to turn the vendor name on a product page into a link to that brand, plus Brand header and Brand footer for banner and description content on the brand collection pages themselves.
Does the directory update itself when you add a product?
On the app route, yes, and it costs nothing on any plan including Free. Adding, changing or deleting a product queues a rescan that waits for a five-minute quiet window before it runs, so importing 2,000 products becomes one rescan instead of hundreds, and it goes ahead within about half an hour even if you keep editing. There is a switch in settings to turn it off if you would rather publish changes on your own schedule.
When a sync fails, the storefront keeps the brand list it published last and the app retries. A brand page that blanks itself mid-sync is the failure that fills this category's one-star reviews, so the design choice is to change nothing rather than risk it. How brand syncing works covers the manual scan too.
On the manual route your automated collections do keep themselves filled, since Shopify re-evaluates the vendor condition as products change. The directory page listing those collections is the part that stands still.
Manual or an app: which one fits your store?
Build it by hand if you carry a handful of brands that rarely change, already have collections for most of them, and would rather not add another app. Fifteen stable brands, one afternoon, and you own every line of it.
Reach for an app once the list moves. Brands arriving and leaving every month, more than 50 of them, wanting search and logos, or planning to rank each brand page in Google all push the same direction.
The two routes meet in the middle anyway. A collection per brand is worth having whichever way you go, and if you want them without building each one by hand, Easy Brand Page bulk-creates one collection per vendor on its Premium plan, linking any that already exist instead of duplicating them.
Still undecided? Install it, run the scan, and look at the brand list it produces. That list is the same one you would have typed into a spreadsheet, and seeing your own brands in it usually settles the question faster than any comparison does.