Easy Tickets & Events turns any phone into a ticket scanner for your Shopify events. Each event has a check-in link: open it in the phone’s browser, type the event’s PIN and scan QR tickets with the camera. There is no app to install and no limit on phones.
On this page
- How does any phone become a Shopify ticket scanner?
- How does the check-in PIN keep the scanner link private?
- What does the door staff see when they scan a ticket?
- How do staff check in a guest whose QR code will not scan?
- When is a ticket allowed to be scanned?
- Can staff check guests in with Shopify POS or from the order page?
- Does the ticket scanner work without internet?
- What this does not do
- How do you set it up?
- Who uses this?
- What should you read next?
- Common questions
How does any phone become a Shopify ticket scanner?
Every event has its own check-in link, and any phone that opens it and types the PIN becomes a scanner.
The page runs in the phone’s browser. Door staff need no app from an app store, no Shopify login and no POS.
Three places in the admin give you the link
All three open the same check-in page for this event.
- The Check-in card on the event’s Dashboard tab, where Start now opens the page in a new browser tab.
- Event settings > Check-in, under PIN and scanner link, where the Check-in URL box has a Copy URL button.
- The Time slots tab of a recurring event, where each date has a Check in button that opens the page on that date.
Email me the check-in link puts it on the door phone
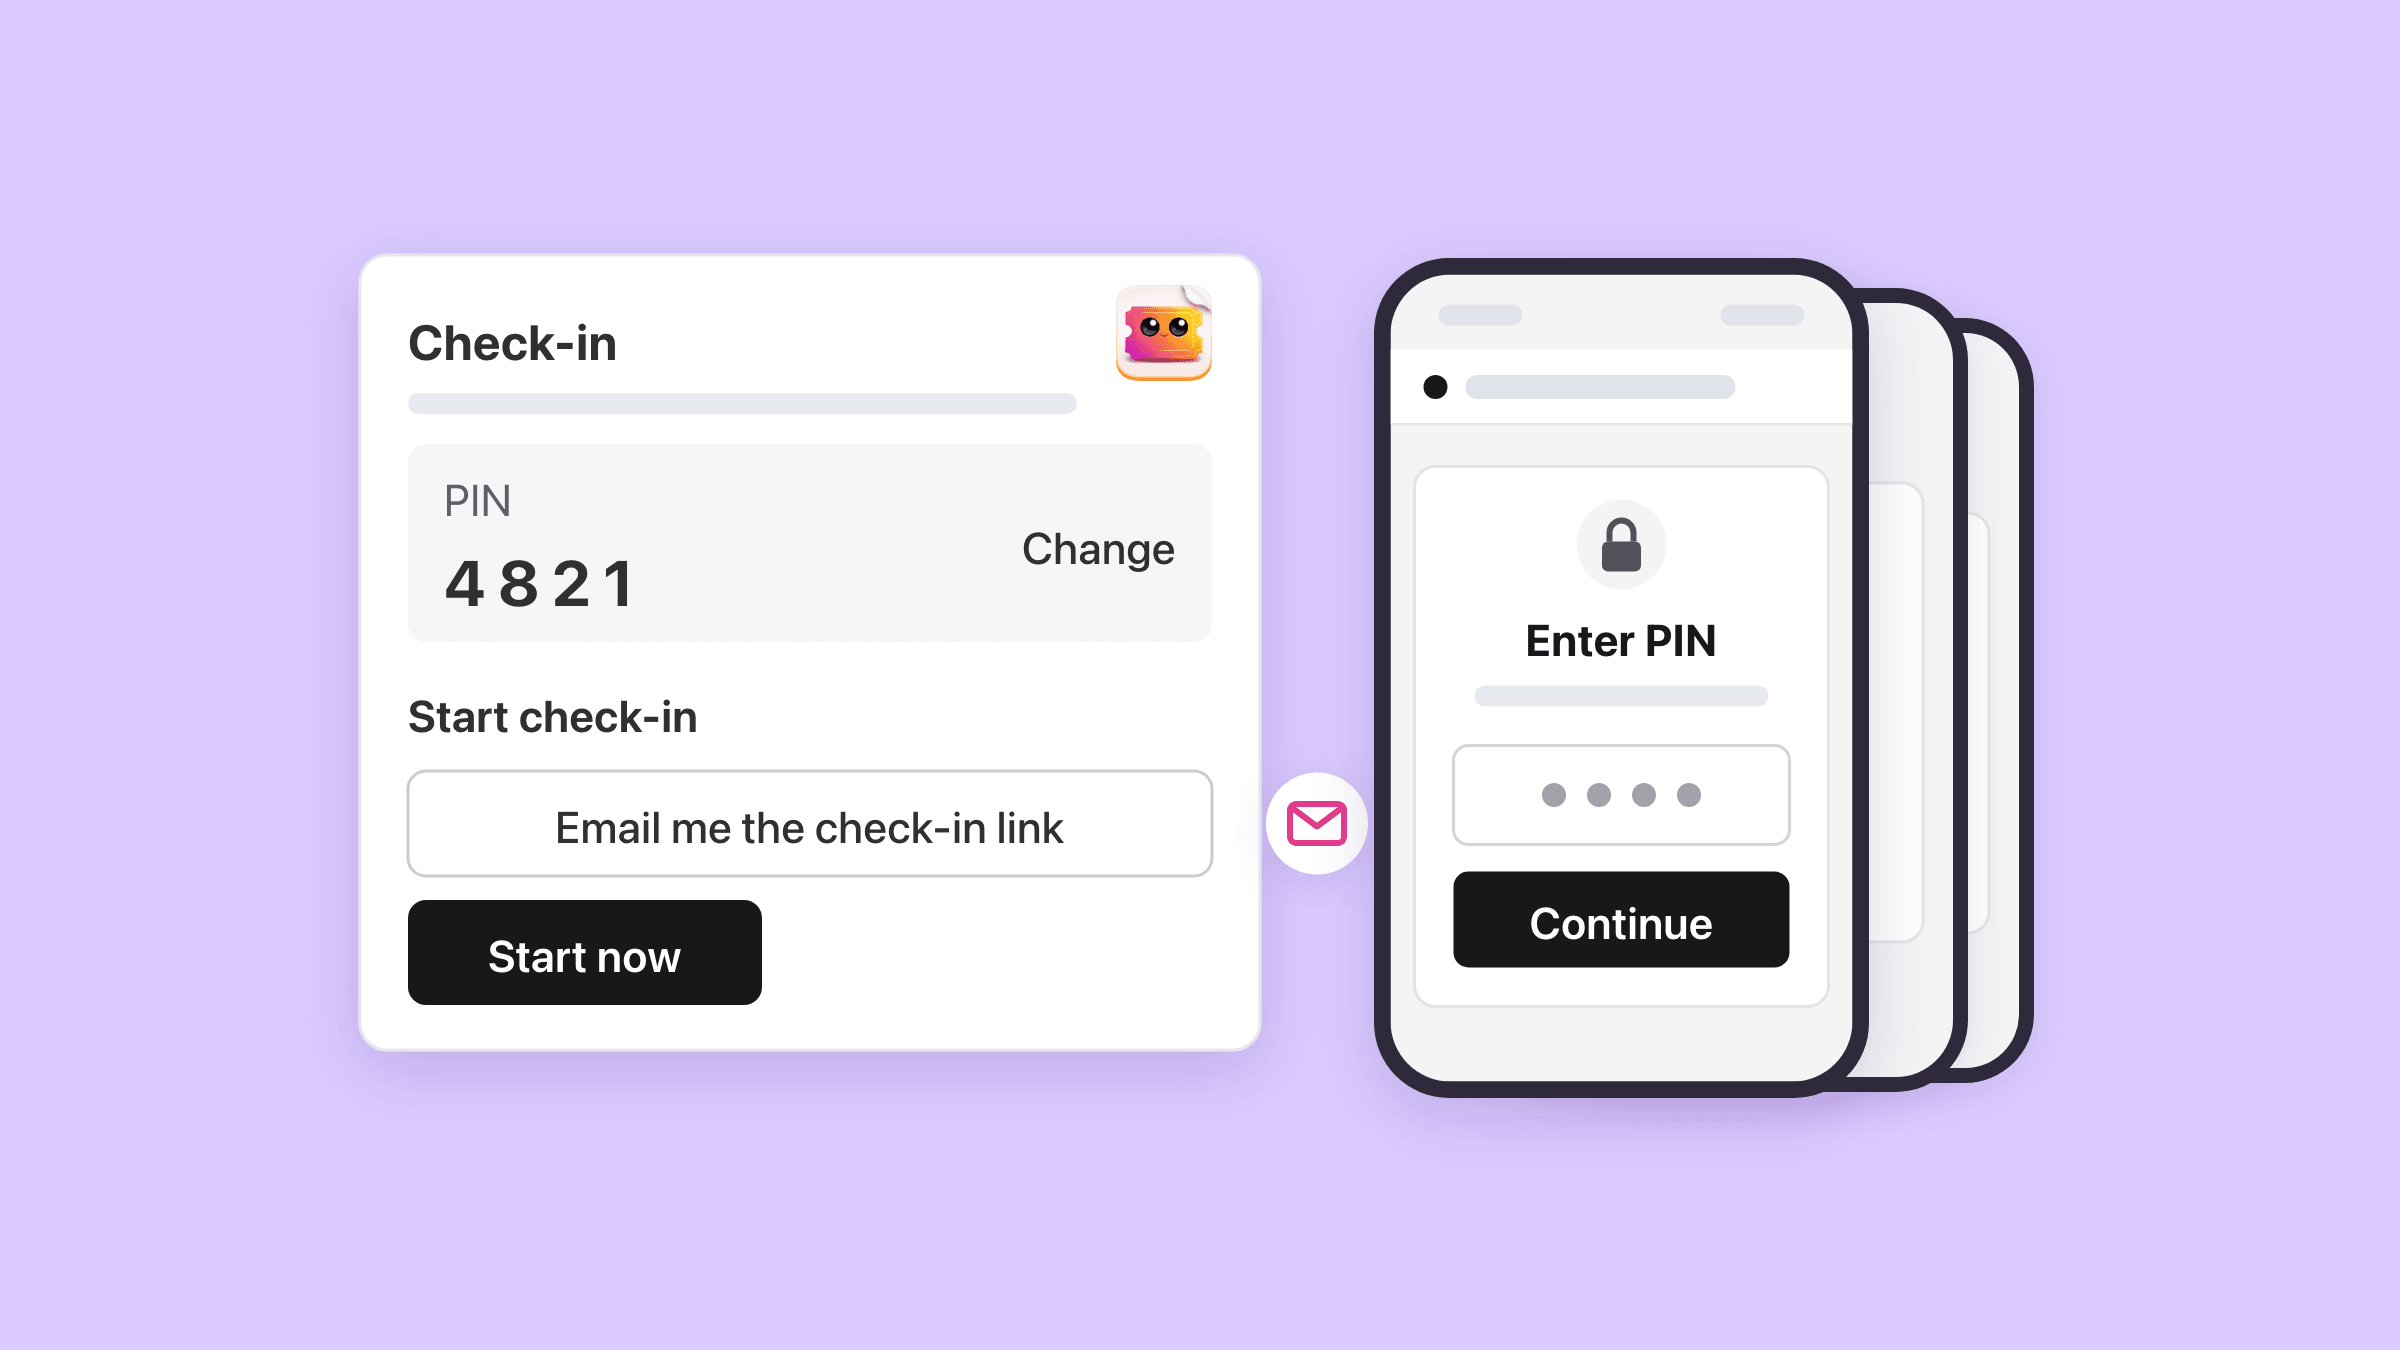
Email me the check-in link sits beside Start now. Type any address under Send to, select Send the link, then open the email on the phone that will scan.
The email carries the PIN as “Check-in code” and a “Start check-in” button. On a recurring event it opens the nearest upcoming date.
Any number of phones, each with a home-screen icon
Nothing in the app counts or limits devices, so every volunteer can scan from their own phone at once.
Add the page to the home screen and it opens full screen, like an app. In Safari that is Share, then Add to Home Screen; in Chrome, Install app from the menu. Each icon opens one event.
How does the check-in PIN keep the scanner link private?
Every event with check-in on has a PIN, and the page shows no names and records no scan until a phone has typed it.
The PIN cannot be switched off. Saving an empty PIN box makes the app create a new one.
There are no staff accounts and no PIN per person. Anyone holding both the link and the PIN can check guests in, so keep them within your team.
A random 4-digit PIN to start, or 4 to 12 digits of your own
A new event starts with a random 4-digit PIN. Change it in the Dashboard’s Check-in card or under Event settings > Check-in > PIN and scanner link, using 4 to 12 numbers.
A recurring event has one PIN for every date in the series, set on the series.
One PIN entry lasts 12 hours on that phone
Staff type the PIN once per phone, and the phone stays signed in for 12 hours, long enough for a full shift. After that the page asks again by itself.
Changing the PIN does not sign out a phone that typed the old one. It stays in until its 12 hours run out.
Wrong guesses lock the PIN box, not the door
Only wrong PINs count, and phones on the same venue Wi-Fi can count as one device.
A device gets 5 wrong tries in 5 minutes, and the event gets 10 from every device together. Past either, the PIN box locks for up to 5 minutes, and phones already signed in keep scanning.
What does the door staff see when they scan a ticket?
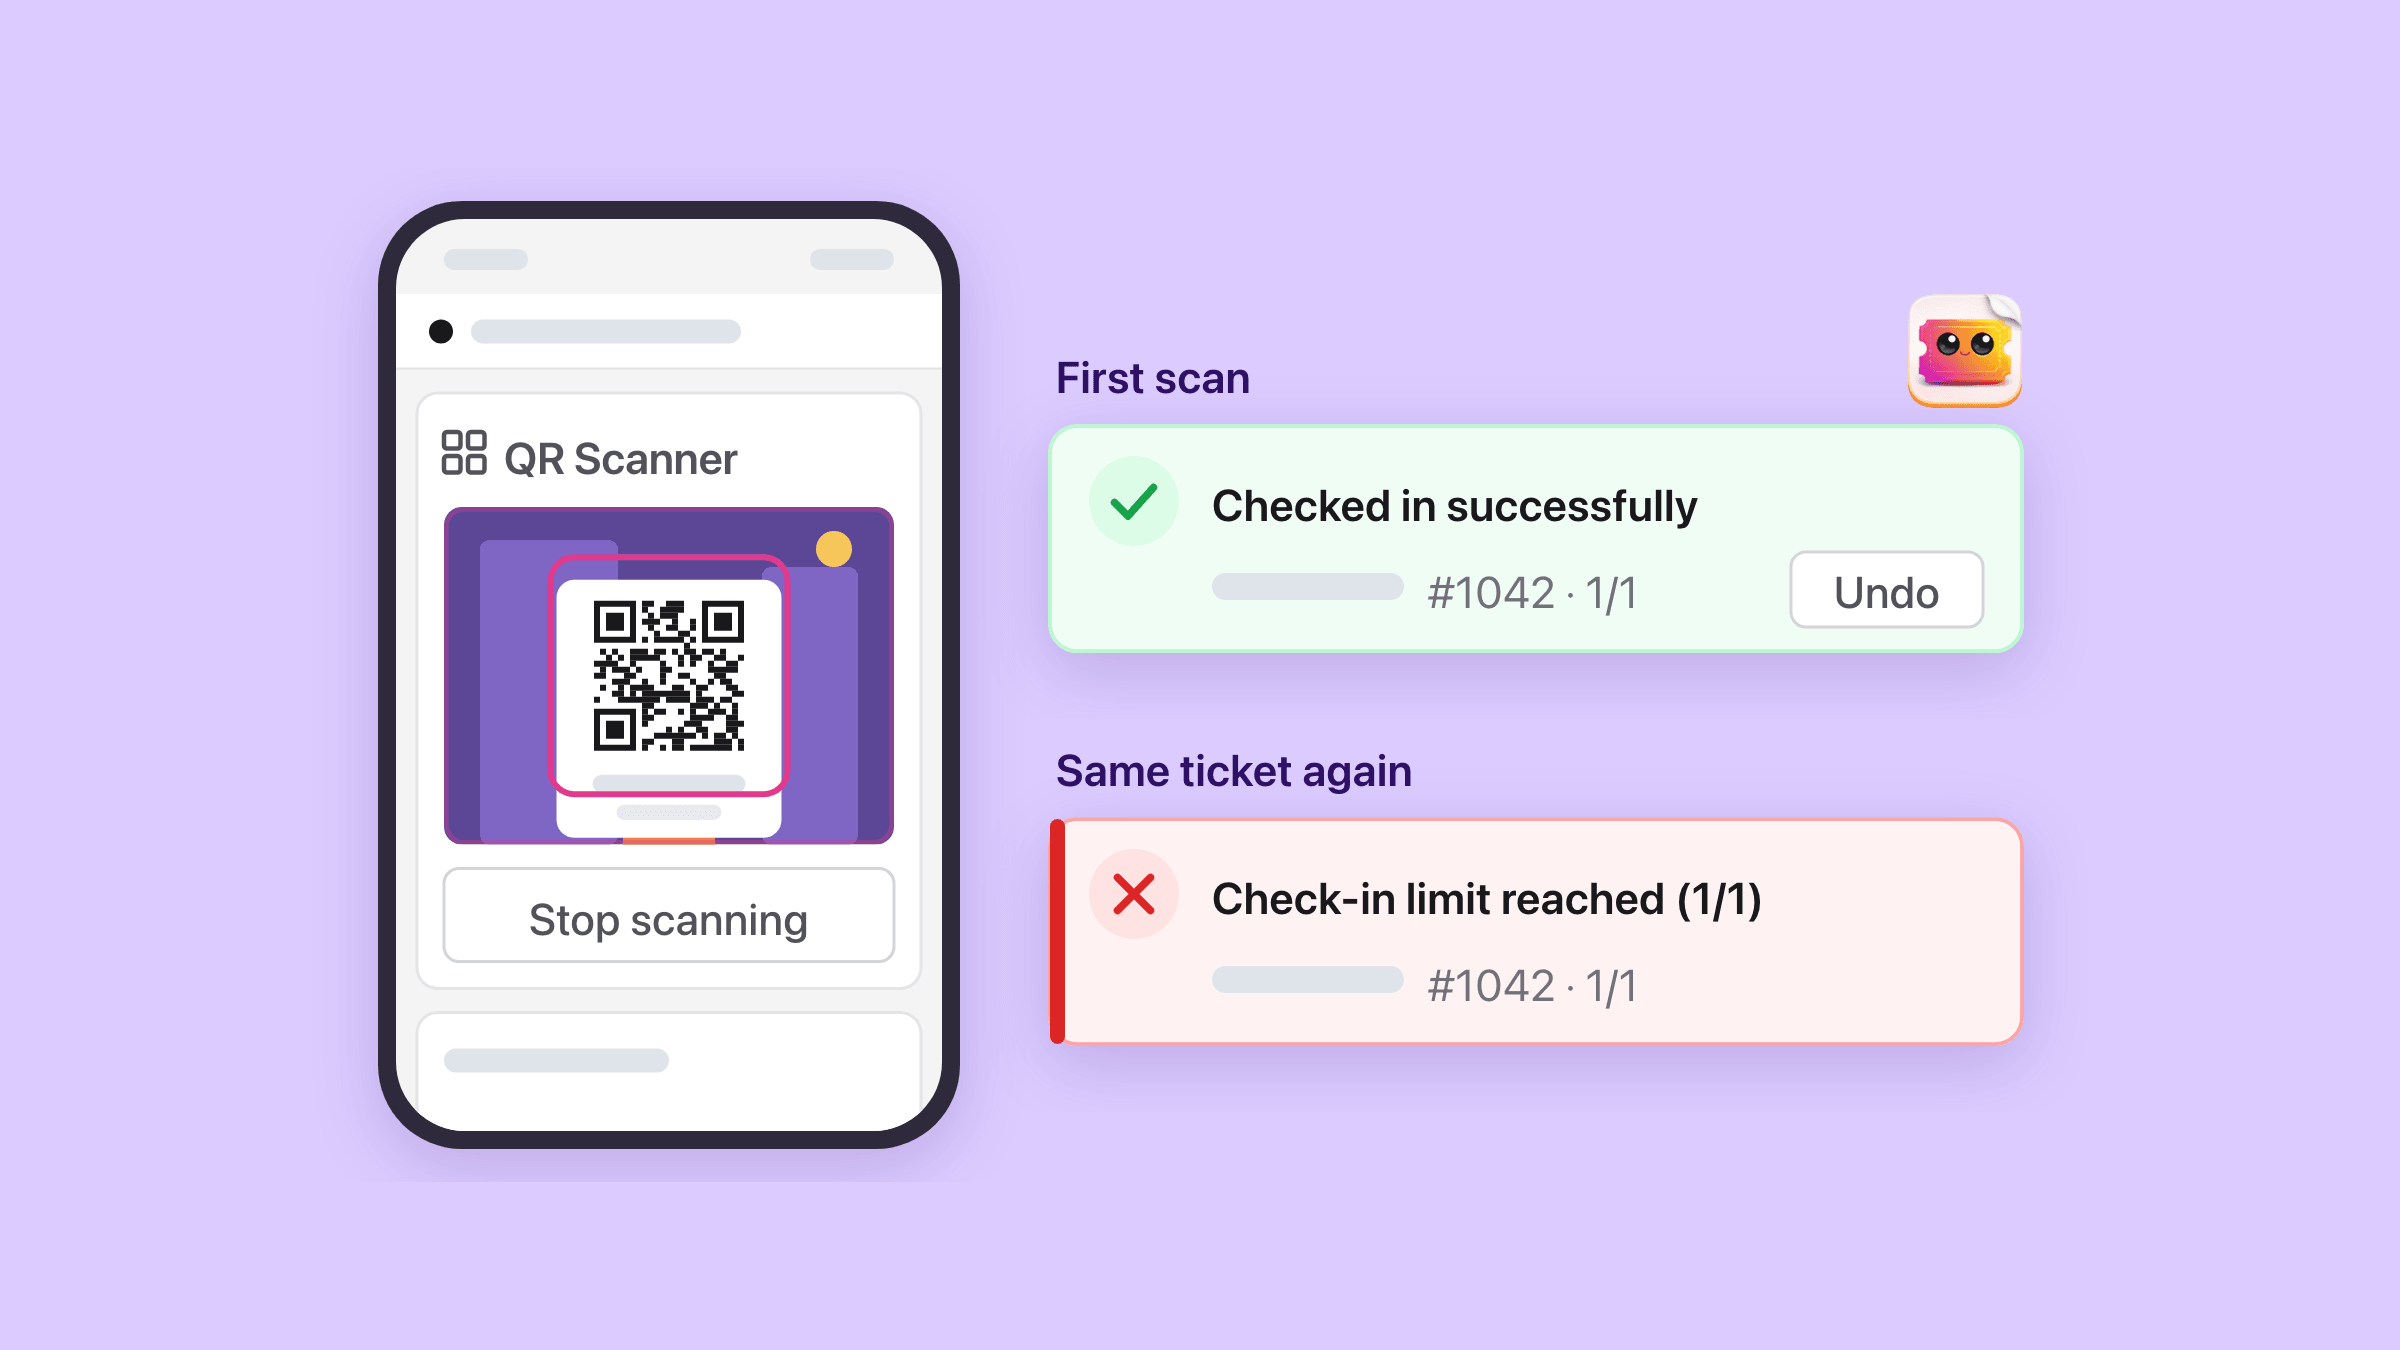
The ticket checks in the moment the camera reads it, and a card at the bottom of the screen says who it was.
The page is in the App language from Settings > Language & region, one of six, and staff cannot change it on the phone.
The camera reads QR codes, silently
Staff tap Open camera in the QR Scanner card, and a valid code admits at once, with no confirm step. The camera reads QR codes only, on a screen or on paper.
It plays no sound and does not vibrate, so staff watch the screen.
A code held in view is read once. For a second entry on a pass, take it away for a second and show it again.
Green cards admit, red cards say why
A green “Checked in successfully” card shows the name, seat, ticket code, ticket type and entries used, such as “1/1”, with an Undo button. It clears after 2.5 seconds.
A red card stays for 6 seconds, so a shared screenshot gets noticed. These are the reasons it gives:
- “Check-in limit reached (1/1)” means the entries are used up, as on a second scan of a one-entry ticket.
- “Check-in is not yet open” or “Check-in is not allowed at this time” means the rules say not now.
- “This ticket was cancelled”, “This ticket was refunded” or “This ticket has expired”.
- “This ticket is waiting for a new date” means it was taken off its date.
- “This ticket is for a different event” or “Ticket not found”.
The Checked in and Missing lists keep the count
Under the scanner, a counter such as “120/300” sits over two tabs, Checked in and Missing. Other phones’ scans arrive with this phone’s next scan, undo or reload.
- Checked in lists guests with an entry, newest first, with the time of their latest entry.
- Missing lists the date’s tickets with no entry yet, A to Z by first name. Tap a row, then Check in.
- Rows from a booking of two or more say “Group of” with the size and the order number.
- Undo on the green card, or Remove on a Checked in row, takes back the latest entry. Allow undo check-in can switch that off per ticket type.
Tap a ticket to scan it. Try the one that was scanned already, and the refunded one.
How do staff check in a guest whose QR code will not scan?
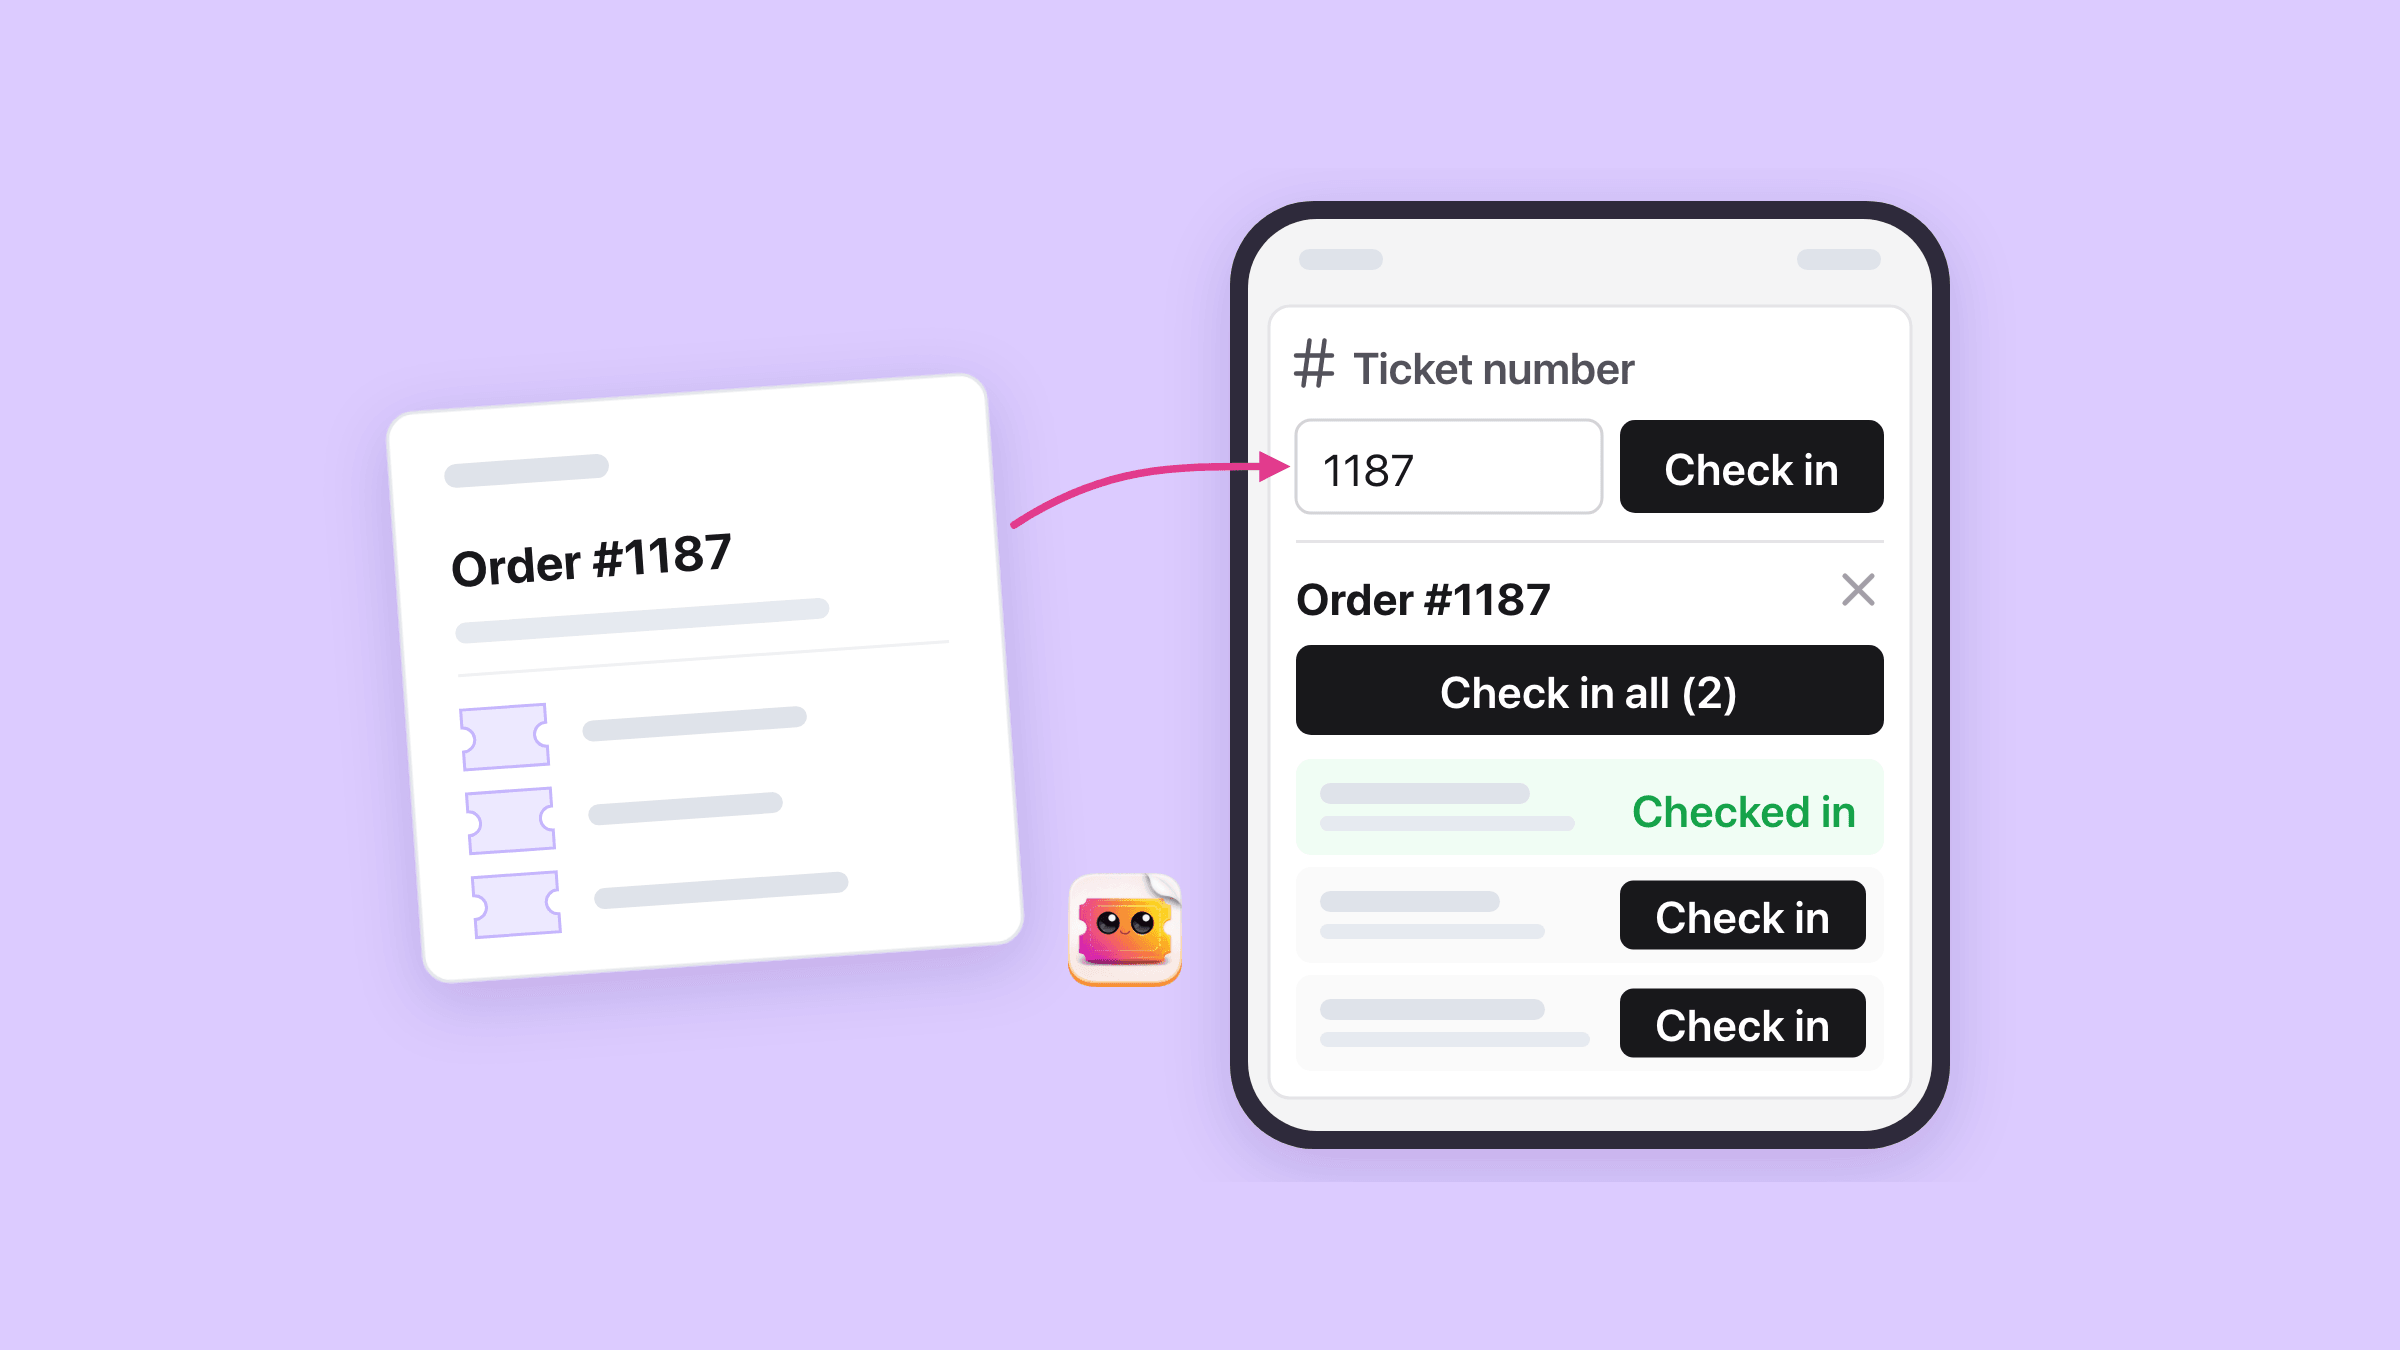
They type the ticket number, or the order number from the guest’s confirmation, into the Ticket number box.
A typed ticket number checks in straight away
Type the number and tap Check in, and the ticket is checked in with the same rules as a scan. The app tries the code as typed, then with a # in front, so 1042 finds #1042.
Only the date on screen is searched. A code with letters is typed in full, with the phone’s keyboard switched from numbers.
An order number opens the whole booking
Digits that match no ticket on that date are tried as an order number.
A panel such as “Order #1187” lists every ticket in the booking, with Check in on each row.
“Check in all (2)” admits everyone not yet in, one by one, each with its own result card. The panel covers orders placed through Shopify, not guests you added by hand.
Door mode adds a name search from 2,000 tickets
A date with 2,000 or more active tickets opens in door mode by itself. It shows the counter and the latest 25 check-ins, and Find searches by name or email from two characters.
Below 2,000 tickets on a date there is no name search, and the Missing list is the lookup.
When is a ticket allowed to be scanned?
Whenever its ticket type’s rules allow, and the phone page, Shopify POS and the Shopify order page all follow the same rules.
Each ticket type has a card under Event settings > Check-in. Above the cards sits Enable check-in, one switch for the whole event, on by default.
- Turned off, it shows “Check-in is off” on every phone, even phones already signed in.
- Every scan is then refused, and the check-ins already recorded stay.
- Turning it back on keeps the PIN, the link and the rules.
Any time, after the start, or a window you set
Every card starts on Any time, which lets you scan the queue before doors open.
On a recurring event, a QR for any date of the series is admitted. Any time after event starts is what holds back a later date’s ticket.
- Any time after event starts refuses a ticket until its own date begins, at midnight UTC, with “Check-in is not yet open”.
- Custom start / end times admits only between Check-in starts and Check-in ends, in the time zone of the computer that saved them.
- Only during scheduled event time does nothing on a one-day event or a series date. On a multi-day event it closes at midnight UTC as the last day begins, so skip it there.
Entrance limit decides re-entry and multi-day passes
Each check-in uses one entry. Entrance limit starts at 1, so a second scan answers “Check-in limit reached (1/1)”.
Raise it for re-entry, such as 2 for a smoking area. It counts entries, not days, so a 3-entry pass can be spent on day one.
A Friday-to-Sunday festival pass: Any time, or Custom start / end times from Friday morning to Sunday night, with an Entrance limit of 3. A fourth scan reads “Check-in limit reached (3/3)”.
Tickets can expire a set number of days after purchase
Ticket expires after (days) stops a ticket that many days after it was bought or added, whatever the event date.
It suits a voucher or an open pass, and it shows only with Any time or Any time after event starts.
Can staff check guests in with Shopify POS or from the order page?
Yes, with the Check In tile in Shopify POS or with Manage check-in on the Shopify order page, and both follow the same rules.
The Check In tile scans at the till
Add the Check In tile to the POS home screen, then pick the event; each date of a series is its own row. Open Camera Scanner uses the POS camera, and a barcode scanner connected to POS works too.
Search attendees finds a guest by name, email, ticket code or seat from two characters, with Check in on the row. Staff pinned in to POS without a Shopify login type the event’s check-in PIN.
Each POS scan needs a connection too. The guide to selling and scanning with Shopify POS covers the till side.
Manage check-in works from any Shopify order
Open the order in Shopify, then More actions > Manage check-in. Each ticket has Check in, Record another entry on a multi-entry ticket, and Undo check-in.
It works one ticket at a time, with no camera, on orders up to 60 days old.
Only the order page records who checked a guest in
Each door leaves a different line in the ticket’s history, and all three fire the Attendee Checked In trigger in Shopify Flow once per entry.
- The phone page records nobody, and the history says “Person not recorded”.
- Shopify POS shows “Change made in Shopify POS” with “Person not recorded”.
- Manage check-in shows the staff member’s name with “Change made in Shopify Admin”.
Does the ticket scanner work without internet?
No. Every scan, typed number and undo is sent to Easy Tickets as it happens, so each one needs a live connection.
There is no offline mode and no queue that sends scans later, on the phone page or at Shopify POS.
A dropped signal stops the scan, not the page
A phone that loaded the page before can reopen its last copy without a signal. That copy cannot record a check-in until the connection is back.
A phone that has opened a check-in page before, but not this one, shows “You are offline. Reconnect and reload to continue check-in.” A phone that never opened one shows its browser’s own no-connection page.
A scan whose answer got lost is not counted twice
If the answer to a scan goes missing on the way back, scan the ticket again. The app recognises the repeat and does not spend a second entry.
Two phones cannot both admit a one-entry ticket, because each scan is checked against the same guest list and the second one is refused.
Plan the signal before doors open
A few minutes at the entrance the day before saves a queue on the night.
- Test the signal standing where the scanner will stand, not at the bar.
- Keep one phone on a mobile hotspot as the fallback.
- Open the check-in page on every phone before doors, so a weak signal only has to carry the scans.
What this does not do
- No offline mode. Every scan, typed number and undo needs a live connection, on a phone and at Shopify POS.
- No sound or vibration on the phone page. The result card is the only signal.
- No name search on the phone page below 2,000 tickets on a date. The Missing list is the lookup there.
- No staff names on phone or POS check-ins. Only Manage check-in on the Shopify order page records who checked a guest in.
- No PIN per person and no way to sign a phone out early. Each event has one PIN, and a phone stays signed in for 12 hours.
- No barcode scanner on the phone page, which reads QR codes with the camera. A scanner connected to Shopify POS works in the Check In tile.
- No kiosk or self check-in. A guest who opens their own QR code with an ordinary camera app sees a plain data page, and nothing is checked in.
- No event picker on the phone page. One link opens one event, or one series with its dates.
- No whole-order check-in at Shopify POS or on the order page. Check in all lives in the phone page’s order panel.
How do you set it up?
Check the PIN and the rules
Open the event, then Event settings > Check-in. Enable check-in is on for every new event, and the PIN sits under PIN and scanner link, with Change to set your own.
On each ticket type’s card, set the Entrance limit and pick a window under When is check-in allowed? On a multi-day event, pick Any time or Custom start / end times.
Found under Easy Tickets & Events > Events > [your event] > Event settings > Check-in.
Send the link to the door phones
On the event’s Dashboard tab, the Check-in card holds Email me the check-in link. Send it to each phone that will scan, or to one address and forward it to your team.
Start now opens the page on the computer you are at, and Copy URL on the Check-in tab copies the link for a message.
Found under Easy Tickets & Events > Events > [your event] > Dashboard.
Sign each phone in before doors
Open the link on each phone, type the PIN, tap Open camera and allow the camera. Add the page to the home screen while you are there.
Scan one ticket to see the green card, then tap Undo so it scans again on the night.
Found under the check-in page > QR Scanner, on each door phone.
Add the Check In tile if you run Shopify POS
On each POS device, add the Check In tile to the home screen the way you add any tile. It uses the same PIN and the same rules.
The check in with any phone guide covers every message and setting on the page.
Found under Shopify POS > home screen.
Who uses this?
Club nights and gigs
Two volunteers on their own phones at one door, and a red card for any screenshot that comes round twice.
Festivals and multi-day events
A weekend pass with an Entrance limit of 3, scanned at several gates on phones that share one PIN.
Classes and workshops
A weekly class on one link, with the Time slot box set to tonight and the Missing list showing who is still due.
Read the guideShops with a till at the door
Walk-ups sold at Shopify POS and scanned on the same Check In tile, against the same guest list.
Read the guideWhat should you read next?
Sell and scan tickets with Shopify POS
The till side of the door, from selling a walk-up ticket to scanning it on the same event.
Check-in rules in the manual
Every window, the entrance limit, expiry and the off switch, with the exact message for each.
Free event registration and RSVP
Free tickets scan like paid ones, and a big free day is where door mode takes over.
Reserved seating from a seat map
On a seated event the seat prints on every scan card, so staff can point each guest to their row.
See every Easy Tickets featureRead the setup guide in the manual